Spreading The World of Contracting


Showing posts with label Tips. Show all posts

Saturday, June 25, 2016

Knowing Your Measurements

Knowing how to read a tape measure, measuring tape, ruler, measuring wheel and distance measure is crucial to any project! It will determine if you will need to make one cut (get it right the first time) or many cuts and if your cuts are to long or to short. Measuring tools are a lifeline to anyone working with their hands. Either in construction, painting, remodeling, tailoring, carpentry, sewing, woodworkers, cabinet makers, landscaping etc. Measurement reading will determine if your project will be a success or failure.


Sunday, November 15, 2015

Difference Between Eco Friendly & Normal Paint


Conventional Paint and VOCs

When you open a can of conventional paint what you'll see is a creamy blend of plasticizers, adhesives, hardeners, pigments, biocides, drying accelerators, solvents and more. The solvents used in conventional paints are Volatile Organic Compounds. VOCs help hold the ingredients in a blended state while the paint is liquid, but they escape to the air when the paint is applied. Outdoors, VOCs combine with other airborne pollutants to create smog. Indoors, VOCs and plasticizers contribute to unhealthy indoor air, and extended exposure to these hazardous air pollutants (HAPs) can lead to respiratory and metabolic illness, headaches and a host of other disorders. Conventional paints may continue emitting trace portions of VOCs, biocides and plasticizers for more than a year after application.

Low-VOC Paints

EPA regulations allow interior water-based house paints, for instance, to contain up to 250 grams of VOCs per liter of paint. Many communities have set the bar lower; in San Francisco, flat wall paint is limited to 50 grams per liter (g/L). Some paint brands feature house paints with 50 g/L VOCs, and paints that are free of VOCs altogether are now common as well. Paint companies often tout these products as an environmentally friendly option, but the eco-reality is a bit more complicated. These products may still contain HAPs, and adding colorants to some low-VOC paints can kick the VOC measurement up as high as 190 g/L.

Conventional Paint and VOCs

When you open a can of conventional paint what you'll see is a creamy blend of plasticizers, adhesives, hardeners, pigments, biocides, drying accelerators, solvents and more. The solvents used in conventional paints are Volatile Organic Compounds. VOCs help hold the ingredients in a blended state while the paint is liquid, but they escape to the air when the paint is applied. Outdoors, VOCs combine with other airborne pollutants to create smog. Indoors, VOCs and plasticizers contribute to unhealthy indoor air, and extended exposure to these hazardous air pollutants (HAPs) can lead to respiratory and metabolic illness, headaches and a host of other disorders. Conventional paints may continue emitting trace portions of VOCs, biocides and plasticizers for more than a year after application.

Low-VOC Paints

EPA regulations allow interior water-based house paints, for instance, to contain up to 250 grams of VOCs per liter of paint. Many communities have set the bar lower; in San Francisco, flat wall paint is limited to 50 grams per liter (g/L). Some paint brands feature house paints with 50 g/L VOCs, and paints that are free of VOCs altogether are now common as well. Paint companies often tout these products as an environmentally friendly option, but the eco-reality is a bit more complicated. These products may still contain HAPs, and adding colorants to some low-VOC paints can kick the VOC measurement up as high as 190 g/L
.

Friday, June 6, 2014

Mildew Build Up

You find mildew growth just about anywhere in your home. From your bedroom closet, bathroom ceiling, kitchen walls and all the way down to your basement. Cleaning it is simply, but keeping it from coming back and getting rid of it permanently can be tough and in some cases nearly impossible! Mildew not only grows on the surface of your painted walls, but underneath on the drywall and as deep as inside your walls. To kill this pesty fungus, use a mixed solution of bleach, trisodium phosphate (TSP) and water. Before you began using solution, wear safety glasses, rubber gloves to avoid skin irritation and respirator mask for chemical odor. Mix solution in a bucket and use a rag or sponge on soft surface and a scrub brush on hard surfaces. 

Sunday, April 6, 2014

Color Transition


When painting two or more rooms, use colors in the same family. You may start with a Primary Color in one room, Tertiary Color in another room, and a Secondary Color in the next room. Using this system makes for a uniformed transition.

Saturday, April 5, 2014

Paint Roller


When using a new paint roller, rinse it with water and run the roller down the palm of your hands (closed like fist) to remove loose lint hairs. You can also wrap tape around your hand and run it over the roller or use a lint roller. This process with stop you from getting lint hairs in your paint when applying to your walls.


Tuesday, December 11, 2012

Painting a Door


When painting doors, use the "inside-out" technique. Doors, either flush or panel, can be painted quickly with a roller and brush. Brush in all thedifficult surfaces first, then cover as much as you canwith the roller. Use the brush immediately after using a roller to give the paint a grain that will match the wood, across and up and down. It may be best to remove door from hinges and lay it down on saw horses or table. Paint can be applied quicker and thicker with-out the danger of paint sagging. Allow the painted side to dry thoroughly before turning it over to paint other side. Use padding to protect the painted surface.

Exterior Preparation

Frist, cover all tree, bushes and surfaces you want to protect. Second, make all repairs in surface. Scape or sand any peeling paint or surface area. Patch the area after removing peeling paint and then sand. Sweep up dust from area and apply caulking to gaps. Use wood filler or patching material for wholes. Allow to dry and sand until flush with surface. Sand any area that has a gloss to get adhesion. Clean all mildew and stains with a cleaner using a pump sprayer and sponge. Wash all surface with a power washer or water hose (top to bottom and side to side) and allow to dry.  

Thursday, August 9, 2012

Painter Tape


Painter's tape is great product for protecting those area and things you do not want painted. Before apply paint to a surface, make sure to apply tape to all that needs protection like: baseboards, trim, light switches, electric outlets, alarm controls etc. Getting paint off these surfaces can be a pain and only makes your job harder. When applying painters tape to a surface apply even pressure to the ends to give tape a secure lock.This helps prevent paint from leaking behind the tape.

Tuesday, February 28, 2012

Disposal Of Paint


When it comes to paint disposal, take off the top to the paint can. Then let dry or pour some cat litter or mulch into the can if there's a little bit of paint left in can. You can also purchase paint hardener from your local hardware store or home improvement store. Let paint dry for at least 24 to 48 hours or more depending on the amount of paint left over. Once paint has harden scoop it out into a trash bag to be dispose of on your weekly trash day (leave top off can). If you can't get paint out of can, dispose of whole can in trash bag with out top. This can only done with latex paint, for oil base paints you should call your local hazardous waste station or local recycling station (keep label intacted).

Monday, February 27, 2012

Keeping Paint Fresh


After you've painted all that needs to be painted and you still have paint left over and you want to store it away for later touch-ups. Take a piece of plastic wrap and place it on top of the open can. Spray cooking oil over the plastic and tightly secure the lid with a rubber mallet. Turn the bucket upside down, and you'll have a brand-new seal. Air won't get in, and the paint will last longer.

Wednesday, November 30, 2011

Using Chemicals

When using chemicals like solvents, hash chemicals or strippers, protect your skin by wearing neoprene or rubber gloves.  After you paint with oil base paints or primers protect yourself with long sleeved gloves that go from your wrist up to your elbows and wear a long sleeve shirt for extra protection. his will protect you from any splashes that may get on your skin.


Sunday, November 27, 2011

Paint Suit

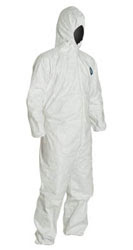
A great way of protecting your clothes or exposed body parts from paint drops and splatters, a Paint Suit is perfect! This full body suit is ideal if your using a sprayer or just want to stay clean as possible. The Paint Suit cove the body from head to toe. If you do not have a Paint Suit, we suggest wearing some old clothing that can be thrown away. Like an old cotton long sleeve shirt, jeans or Dickie's, old sneaker or boots with good tread and a hat.

Saturday, November 26, 2011

Protecting Yourself

If your working in any field of Home Remodeling or Contruction, it's very important to use protection. Before you begin your next project think of these keywords: Head, Eyes, Lungs, Hands, Knees and Feet! Whether in  contruction or working around your house, use head gear (hard hat) especially if there are people working above you. The person above you could drop a tool, causing head injury. Eye protection is highly recommanded in any field of Home Remodelling or Contruction, etc. When cutting, painting, nailing, using chemicals, or in any other place of the job site, especially when others are working in the same area wear eye protecting at all times! If your working in a dusty area, cutting materials (saw dust), using paint or other chemicals alway use a respirator (face mask). Protecting your lungs is a matter of life or death! Many chemical and materials are very harmful to ones health. When carrying sharp object or wood and using tools, put on work gloves. This will prevent getting cuts or splitters and more. Best be sure when working in Home Remodeling or another blue collar line of work, you'll be on your knees! Using knee pads will help you from kneeling down on rock or pebbles, nails, cold concrete, hard floors, etc. All these elements are harmful to the knees and joints. When it comes to prevention of slip and falls, protecting you from twisting the ankle, you need ankle support. A comfy inside sole to prevent feet from hurting after a long days work. A good peer of heavy duty, above the ankle, non slip sole, comfortable work boots, will make your work day even smoother!

Wednesday, November 16, 2011

Scaling Paint

Use a Putty Knife or Scraper to remove flaking, peeling and scaling paint. Keep scraping even when you think you got it all. There may be more loose paint the eyes can't see beyond the obvious area. Then sand area thoroughly to skive down the rough edges.

Tuesday, November 15, 2011

Wall Prepping

Before starting your painting project. Make sure your walls are well preped! Remove all dirt, stains and marking on walls. Also dust and wipe down all doors, borders, trim, window sills and molding! Fill in all wholes, cracks with a compound and fill in wholes in wood and chipped wood with a wood filler. Doing this will help hide in noticable flaws or have none at all!

Driving It Home


When drywall screws or nails are driven home, its head should be recessed slightly below the surface with the head of the hammer to create a "dimple" hollow but, not so deep to breal or tear paper on the wallboard. But, just enough to set the nail or screw head below the surface.The dimple will be then filled with compound to cover the screw or nail head and the dimple impression in the drywall.

Monday, November 14, 2011

Paint Sheen

Flat - walls & ceilings (except kitchen & bath) _ Eggshell - walls & ceiling (can be used in kitchen & bath _ Satin - walls in any room, kitchen & bath ceilings _ Semigloss - high traffic area walls (kitchen& baths), doors, trim, shelving _ Gloss - doors, trim, shelving, kitchen cabinets, bathrooms, wet rooms

Never Lose A Screw Again

When removing lighting, ceiling fans, electric outlet covers, light switch covers, picture hooks, clock hooks and curtain rods. Remember to put all screws, nails and hooks in a container, like a jar, rubbermaid bowl, old coffee can or a hairspray top. If you have a problem remembering where each screw goes, another way to help you is: placing screw back in place after removal of all covers.


Sunday, November 13, 2011

Light Switches & Outlets

When switches and outlet plates are to be painted the same color as the walls, do them separately. Otherwaise, they will stick to the wall, and if you have to remove them, you may damage the paint job, by pulling off the paint.

Sanding & Removing Paint

If you are sanding or removing paint, especially if it is light-colored and applied before 1978. Have it tested for lead by a professional or use a household lead test kit from The Home Depot. Do not attmpt to remove lead base paint by sanding or with a heat gun. Contact Environmental Protection Agency